Want to learn how to make a custom planner that fits your exact needs? Whether you're creating a personal organiser, a printable planner to sell on Etsy, or a digital planner with hyperlinks, this step-by-step guide walks you through the actual process of building your planner inside Planify Pro — with screenshots so you can follow along.
If you're still deciding which tool to use, start with our complete guide to custom planner makers for a full comparison of your options.
Why Make Your Own Planner?
Creating your own planner gives you total control. You can design layouts that match your exact routine, choose your own colours and fonts, include only the pages you need — daily, weekly, habit tracker, meal planner — and export as a printable PDF or an interactive digital planner with clickable hyperlinks.
Whether it's for personal use or to sell on Etsy, you don't need design experience. The drag-and-drop editor, 3,000+ templates and 4,000+ stickers handle the heavy lifting.
What You'll Need Before You Start
- A computer or laptop — Planify Pro works best on desktop browsers. For device recommendations, see our recommended devices guide.
- A Planify Pro account — see the plans for what each tier unlocks.
- Firefox in Private mode — this gives the smoothest experience and avoids browser storage issues.
No design software to download, no plugins to install.
Step 1: Create a New Project
Once logged in you'll land on the Dashboard — your home base for creating planners, accessing saved projects, and browsing templates.
To start, click Create a Planner, the first icon under the welcome banner.

You'll be taken straight into the creation workspace, with your blank planner page and the toolbar at the top.
Step 2: Choose a Template (or Start from Scratch)
You can start with a pre-designed template or build from a blank canvas. If you're a beginner, start with a template — it saves time and gives you a professional starting point.
Click Template in the top toolbar, then choose Starter Templates for built-in designs organised by category, or Public Templates for community-made ones.

Click any template to apply it. You can preview options before committing, and change template later.

Not sure which to pick? Browse our 50+ planner template ideas, or our best printable planner templates.
Step 3: Set Your Page Size and Layout
Click Size in the top menu to pick from A4, A5, US Letter, Happy Planner and more. Custom sizes are supported too.
Then click Layout → Layout Templates to see premade structures, from single-box layouts to multi-column grids. Click any to apply it instantly.


To fine-tune, turn on Edit Layout mode (top left) and drag to resize rows and columns.
Step 4: Add Widgets to Your Pages
Widgets are the building blocks — calendars, to-do lists, habit trackers, daily schedules, notes grids. This is where your planner comes alive.
With Edit Layout on, click inside any empty box marked "Click to Edit". The widget panel opens on the right.

Click a widget to insert it. Add as many as your layout has boxes, and add rows or columns for more space. To remove one, click it in Edit Layout mode and choose to delete the widget or the whole row.
Good widgets for a first planner:
- Calendar widget — monthly calendar with custom start days, moon phases and holidays
- Daily schedule widget — customisable time blocks
- Notes grid — lined, dotted or blank writing space
- Dated widgets — auto-fill dates across your planner
Step 5: Customise Colours, Fonts and Style
Colours: click Color in the toolbar to change widget outlines, headers, lines and backgrounds. Changes apply across the whole planner instantly.

Fonts: click Texts to set fonts for H1, H2 and H3 levels. Hundreds are built in, and you can upload your own.
Widget styles: click Style to browse four categories — Neutral, Minimal, Decorative and Bold. Selecting one applies it to all widgets on the page, or just the selected widget.
Patterns: use the Pattern menu for decorative backgrounds — florals, geometric, textured or solid. Opacity is adjustable so patterns stay subtle.
Step 6: Add Stickers
Planify Pro includes 4,000+ stickers in themed collections — illustrations and icons, plus functional elements like banners, dividers and labels.
Click Sticker in the top menu, browse the collections on the right panel, and click any sticker to add it. Then drag, resize or rotate it.

A few things worth knowing: stickers sit on top of your widget layout as decorative overlays, SVG stickers can be recoloured directly, and it's worth understanding the difference between Sticker Mode and Planner Mode so you don't move elements by accident.
Step 7: Add More Pages and Organise
Use the page manager at the bottom of the screen to add pages, rearrange the order, rename or delete them. Each page can have its own layout and widgets.
For dated planners, the Run Dates feature duplicates a page and updates the dates automatically — a huge time saver over building twelve monthly pages by hand. You can duplicate hundreds of pages at once, such as 365 daily pages for a full year.

Step 8: Save Your Work
If your project has more than one page you'll see a quick save button on the right. Use it often — there is no auto-save, so saving regularly is the difference between keeping your work and losing it.
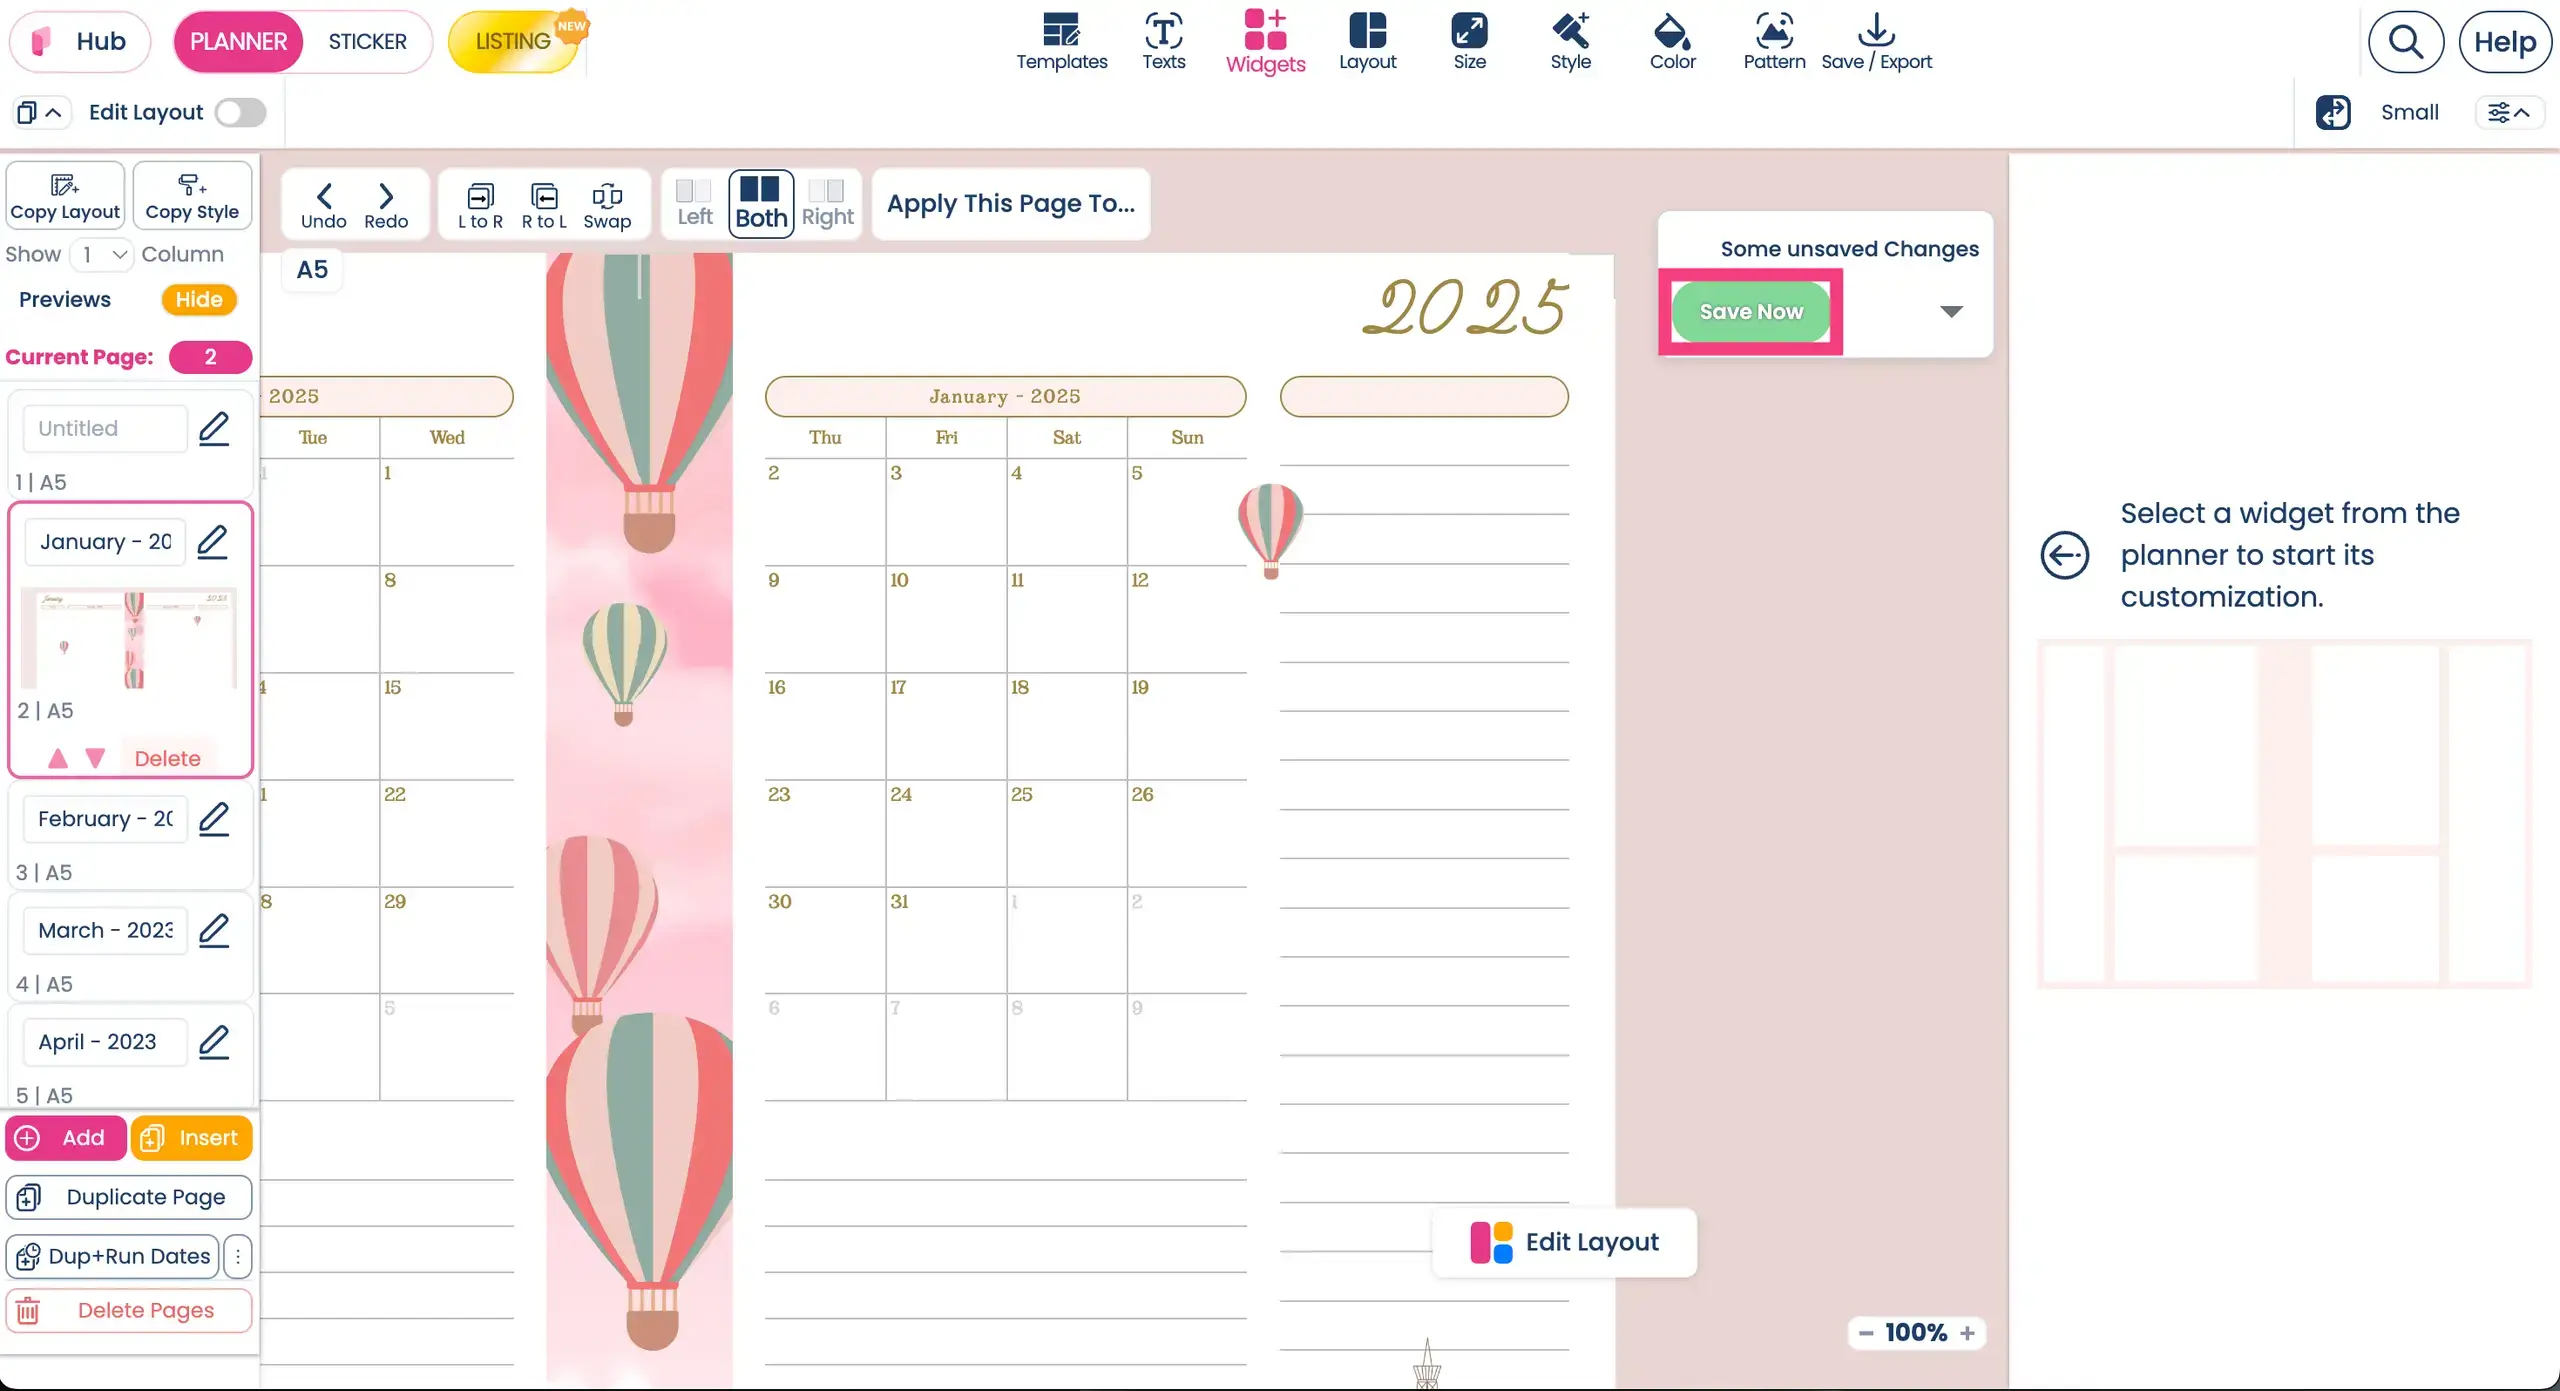
The button can be dragged anywhere or collapsed. For single-page projects, use Save/Export → Save → Save and Update. Saved projects go to your My Collection page, where you can tag and rename them.
Step 9: Export Your Planner
Click Save/Export then Export, and choose your export type:

- Paper Print — high-resolution PDF for printing, with paper size and binding arrangement options
- Digital Planner — interactive PDF with hyperlinks intact, ready for GoodNotes or Notability
- KDP Export — settings for publishing on Amazon KDP
For printables you'll also pick a page arrangement: Ring/Disc Bound for double-sided printing, Binder/Traveler's Notebook for booklet folding, or Do Not Rearrange for exact order.
Step 10: Print and Bind
Print your exported PDF on quality paper — see our best printers for planner making guide for recommendations.
Then choose a binding method:
- Wire binding — professional finish using a Cinch machine. Follow our DIY wire notebook tutorial
- PVA glue binding — creates a lay-flat spine. See our lay-flat sketchbook tutorial
- Signature binding — sewn booklet pages. Try our booklets with signatures tutorial
For a full comparison, read our complete guide to book binding methods.
Making a Digital Planner? What's Different
The design process is the same, but you'll want hyperlinked navigation so users can tap between sections.
Go to Layout → Digital Planner to unlock tabs, hyperlinks and page linking. Choose a two-page spread (landscape, like an open book) or single page vertical (portrait).
The automatic hyperlinking is the real time saver — what takes 10 to 15 hours manually is done in seconds.
Tips for Your First Planner
Start simple. Your first planner doesn't need 50 pages. A cover, a monthly calendar and a weekly spread is plenty. Add more once you're comfortable.
Use templates as starting points. Pick one close to what you want and modify the colours, fonts and layout.
Test before you finalise. Print a few test pages before exporting everything. Check text is readable, writing spaces are big enough, and colours print as expected.
Save often. Especially before making big changes.
Keep it consistent. Two to three fonts and three to five colours throughout. Consistency is what makes a simple design look professional.
What's Next?
- Want to sell? Read our complete guide to selling planners on Etsy
- Considering Canva? Read our honest guide to Canva planner templates
- More DIY tutorials? Browse the full tutorial library
Your perfect planner is waiting. Open Planify Pro and start designing.